Way back in February this year I decided to book tickets for the Heritage Textiles Weekend at the Ancient Technology Centre (ATC) in Dorset. After learning about these workshops a few years ago, and regretting not being able to get myself organised to attend, I was determined to go this year!
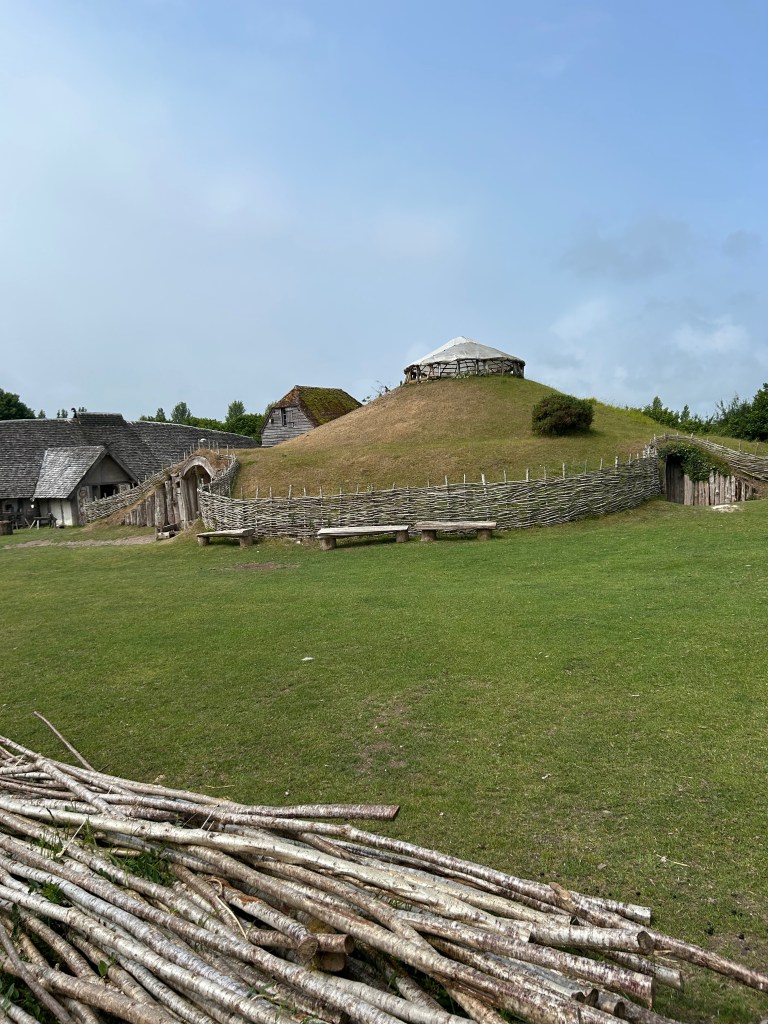
I haven’t been to the Ancient Technology Centre before but it is a lovely site. After check-in and getting my welcome pack, I headed over to the Viking Longhouse for the morning introductory talk. We were then split into four groups for our workshop rotations over the course of the weekend. My group was made up of an interesting mix of people and I really enjoyed hearing about their interest in textiles and what drew them to the workshop.

In this blog post I’m going to give an overview of what we did during the workshop but unfortunately I forgot to take a lot of pictures (I know, I know!!). I was so focussed on the workshops and trying to take everything in…but on reflection, pictures just wouldn’t do much justice to the whole experience!
Saturday Morning: Natural dyes
My first workshop was with Jenny Heath of Drakos Dottir Viking Textiles, who also happens to be part of the Team at the ATC. After a brief introduction about natural plant dyes we went foraging for plants that we could use for one of the dye pots, which also meant that we could do a bit of a site tour. I hadn’t realised the ATC was so big! You can find out more about the buildings and other features their website here.
The natural dyes workshop took place in the Viking longhouse. When we got back from our site tour, Jenny got the dye pots going over the central fire. We each had 16 wool samples that were pre-mordanted and went into pots of: woad, weld, and madder. After they sat in each pot, we could add modifiers to alter the colour. We used: distilled vinegar (acid), wood ash water (alkaline), copper sulphate (powder) or copper wire in vinegar, and ferrous sulphate (powder).
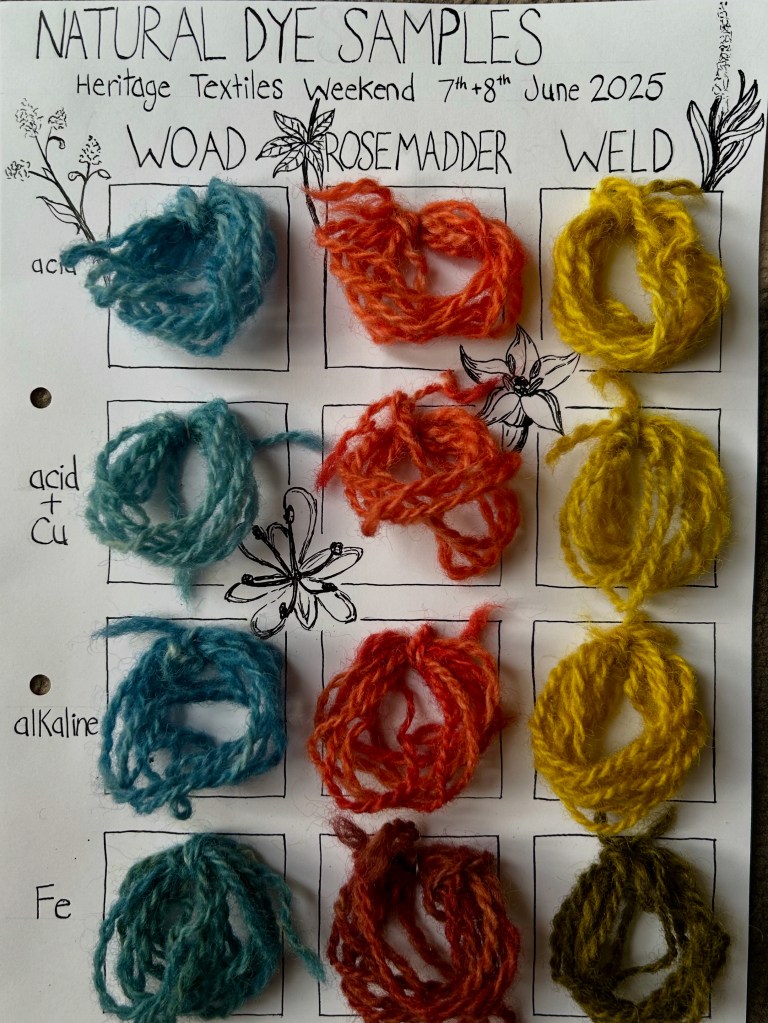
With our natural dye experiments we had free reign to try out whatever we wanted (including over-dyeing with other dye pots towards the end). I have done very little natural dyeing before, so I wanted to keep things simple. As we had four samples per colour, I opted to try one with each modifier and see where that got me. I was overjoyed to see the results of the process! I really cannot get over how bright and vibrant the colours are, which really helps to illuminate just how colourful people’s clothing (and household furnishings?) could have been in the past. I know I sometimes fall into the trap of thinking of the past in terms of black/white/grey and various shades of brown/beige (I do love natural sheep colours!) but the natural dye colours are bright and it is relatively quite easy to change them and extend the range of colours that can be produced by a few simple additions.
With my samples, I used the copper wire in vinegar rather than the copper sulphate (as I felt this would probably be similar to what people used in the past), so I think my results might have been a little less intense than could have been achieved had I used the powdered form. The copper modified samples aren’t too different from the plain acid modified samples, but they are slightly different (a little green or blue?). It surprised me that I like the darker colours made by the addition of the ferrous sulphate, referred to in the natural dye world as ‘saddened’ colours. However, I think I added way too much ferrous sulphate to my samples, and the samples have a distinctly ‘crunchy’ feel. I found out later than iron can damage wool and make it brittle, so that’s probably what has happened.
When I got home, I thoroughly washed my samples. I wasn’t sure what to do with them at first but I decided I wanted to sew them on some card and turn them into a little sampler that I can refer to later.
I also sat down and read Jenny Dean’s book Wild Colour, which I bought last year but wasn’t quite ready to get my head around everything. It turns out it’s not quite as complicated as I thought it would be but I do need to write out the steps for myself to follow. I’m really excited about the possibility of trying out more natural dyeing. I think that in the first instance, I want to replicate what we did at the workshop, but this time I’ll need to pre-mordant my yarn first and set up the dye baths myself. This will give me a chance to work through the process and hopefully have some left over dye bath to experiment with over-dyeing as well.
Saturday Afternoon: Stone Age Sewing Kit
After lunch in the Viking longhouse we joined Sally Pointer for our afternoon workshop. Sally is a wonderful teacher and is full of knowledge and wisdom for making use of natural resources. I took her Introduction to Prehistoric Textiles day workshop a few years ago and it was amazing! In that workshop I learned how to make cordage and used the cordage to start a simple-loop basket, braiding with more than three strands, and I tried out sprang. Her YouTube channel is full of fantastic tutorials about early textiles.
This workshop was a little different from the previous workshop I took from her. It was focussed on the evidence we have for the earliest garments and textiles in the form of sewing. Over the course of the afternoon, Sally provided an overview of the archaeological evidence and how archaeologists have interpreted these finds and their implications for understanding life in the deep past, while simultaneously providing us with instructions for trying out techniques and tools. I have to say, this was quite skilfully done, as it all tied together seamlessly, and left me hungry for more!
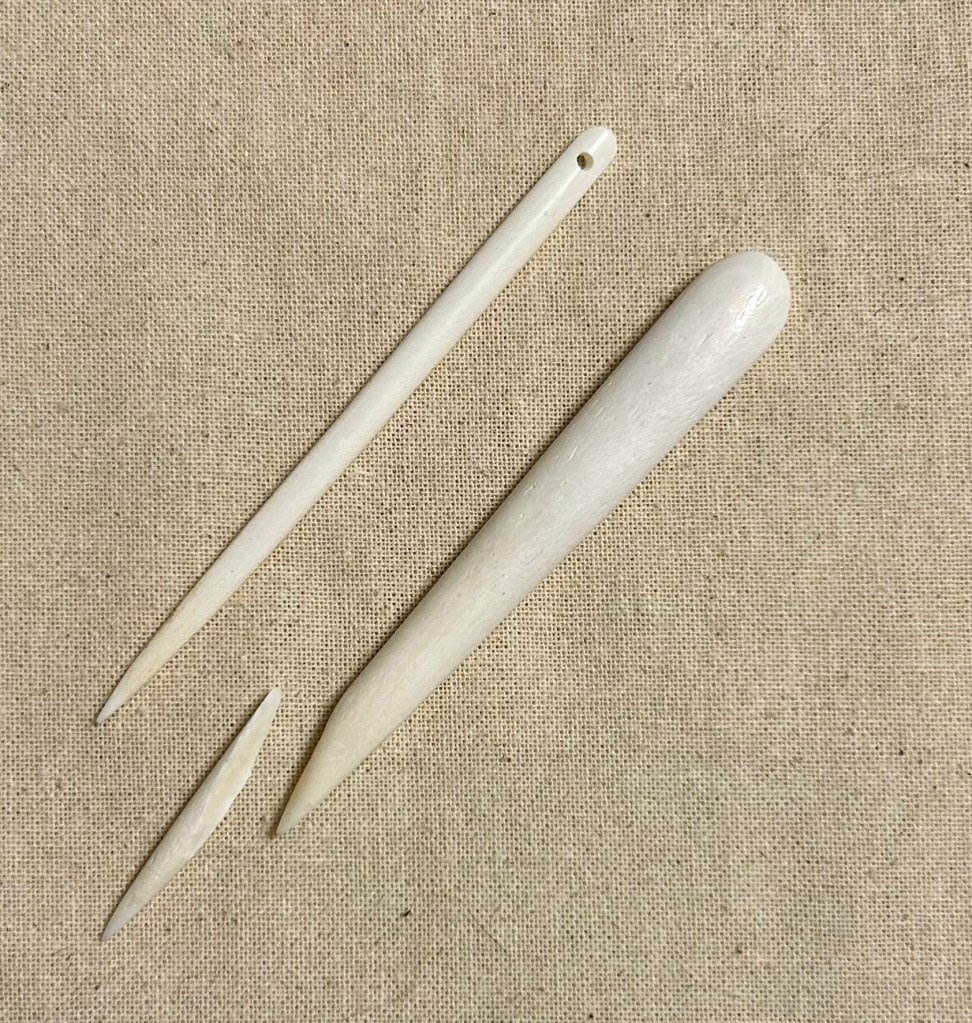
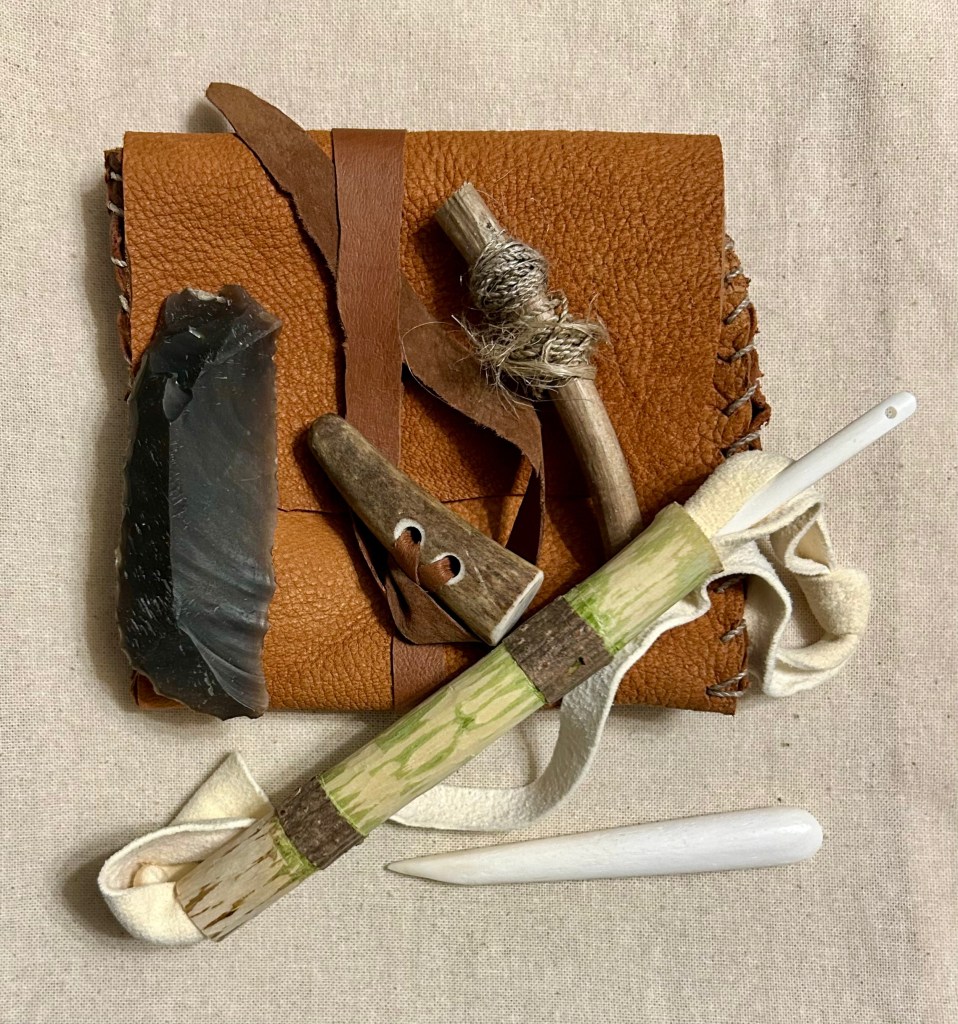
While I can in no way do justice to how Sally presented the content, the marrying up of narrative about the past and trying out techniques was extremely informative. We started by bashing some deer sinew with a rock so that we could make cordage. We then ground down a bone awl to a sharp point and pierced holes in a piece of leather and could easily sew with our sinew cordage…WITHOUT a needle! Apologies to anyone reading this that already knew that this was possible but I haven’t worked with sinew before and had little pre-existing knowledge about what it is like to work with, so I had no idea that I wouldn’t need a needle. Essentially, this suggests that sewn garments made from skins could have existed prior to the introduction of the needle, one just needs a tool to poke some holes. This actually makes a lot of sense, as according to Sherwood & Forssman (2023), the earliest eyed needles date to 49-44 ka, which is the start of the Upper Palaeolithic period. Awls are known from sites dated to 76-71 ka (Middle Palaeolithic). It’s possible that awl use is even older but more analytical work needs to be done to confirm that ‘awls’ were used for piercing skins. For comparison, the earliest known piece of string was made by Neatherthals and dates to around 52-41 ka (Hardy et al. 2020), so it is roughly contemporary with the earliest date of needles.
Back to the workshop….we then made cordage from flax fibres and in comparison to the sinew, I could see there was going to be an issue here. Despite the flax being a robust plant fibre, it would not pass through the leather quite as easily as the sinew did. It is possible that with some beeswax or pitch on the flax, it might have gone through the hole, so I wouldn’t completely rule out the possibility of earlier use of plant materials but it is no where near as easy as the sinew without another tool. Our next task was to sharpen some bone needles to a nice sharp point. It was still easier to use the awl to poke a hole first, I think because it is larger and easier to grip, and then push through the needle. The needle I chose to use was interesting because it is flat and wide. I didn’t realise this at the time, but when sewing, I had to space the holes out and angle them at about 45 degrees, as otherwise the stitching holes tear into each other. I don’t usually have to think about needle size and hole spacing when I sew fabric (as I use tiny needles, thin thread, and make tiny holes), so this was a revelation to me.
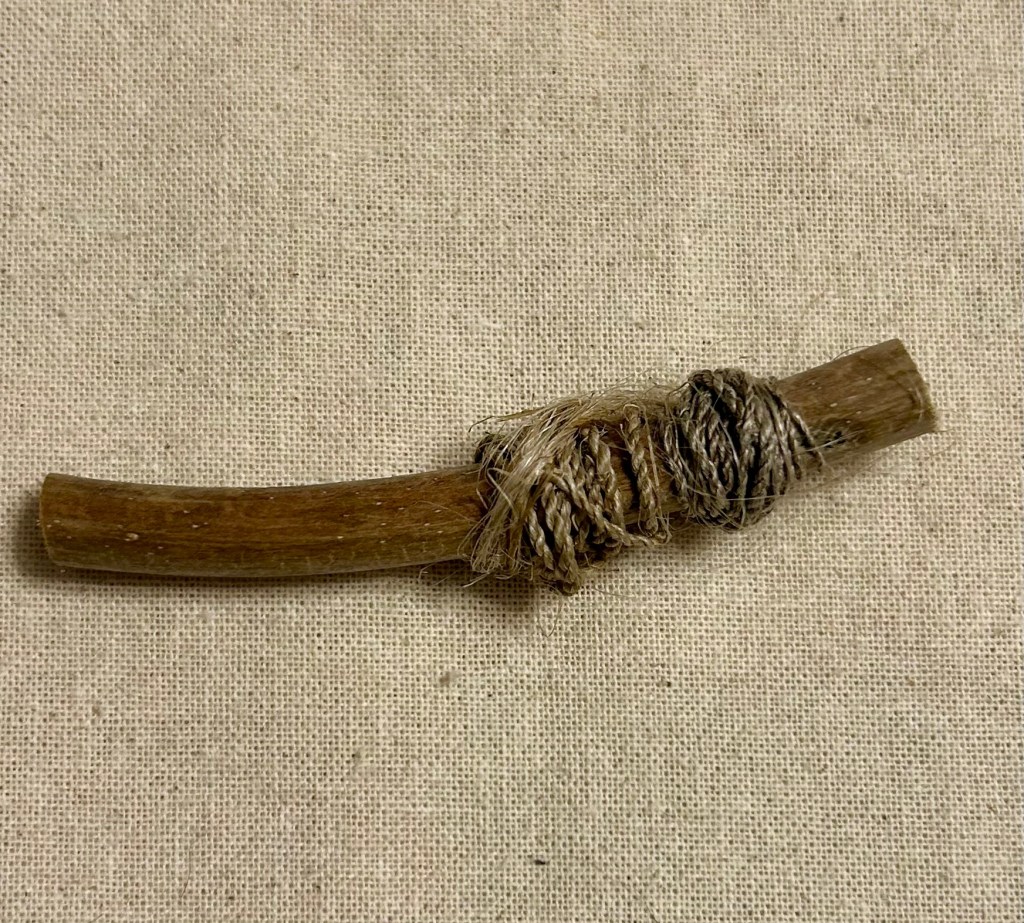
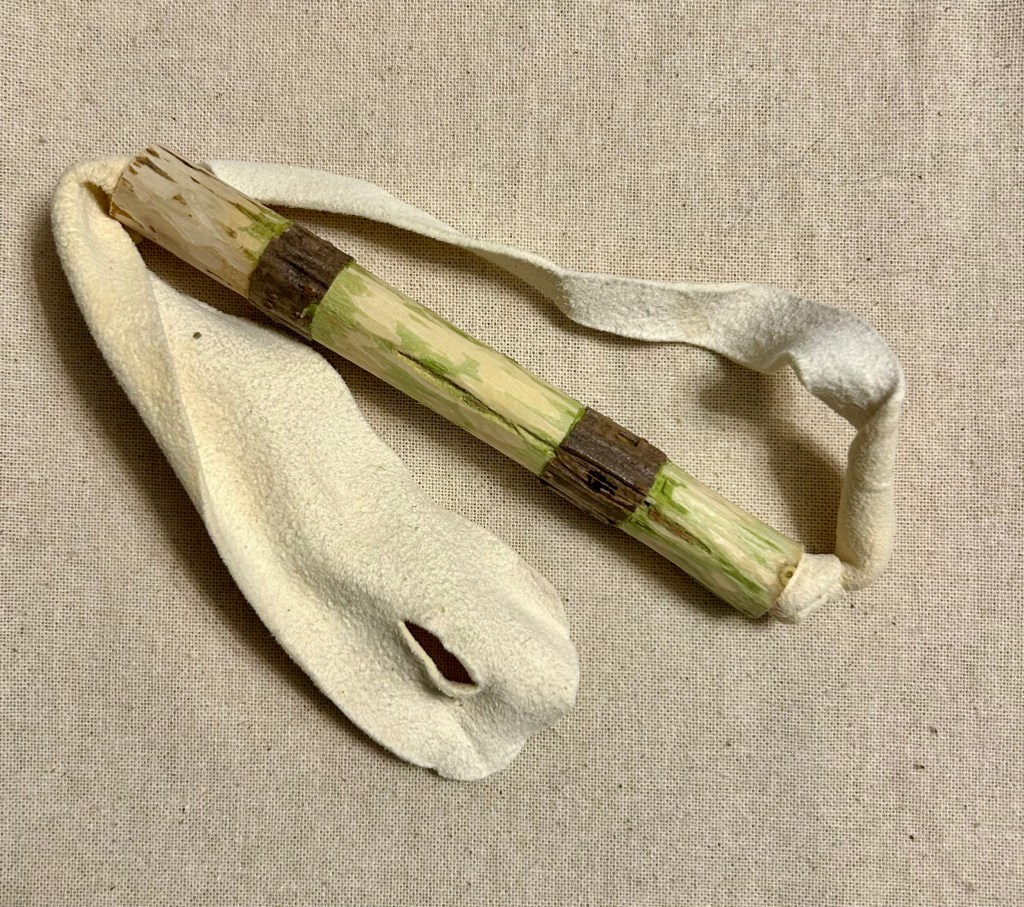
We then made a storage case for our bone needles, which we made out of elderberry tree branch. The inner wood of these trees is very spongey and we could easily remove it with a sharp stick. We then took a pieces of suede and tied some string around one end to make a little envelope to store our needles in. When I got home, I scraped off some of the bark to make a pattern on my needle tube. We also got ‘bobbins’ for our finely crafted cordage, which was a little section of a twig…very high tech here but it works!
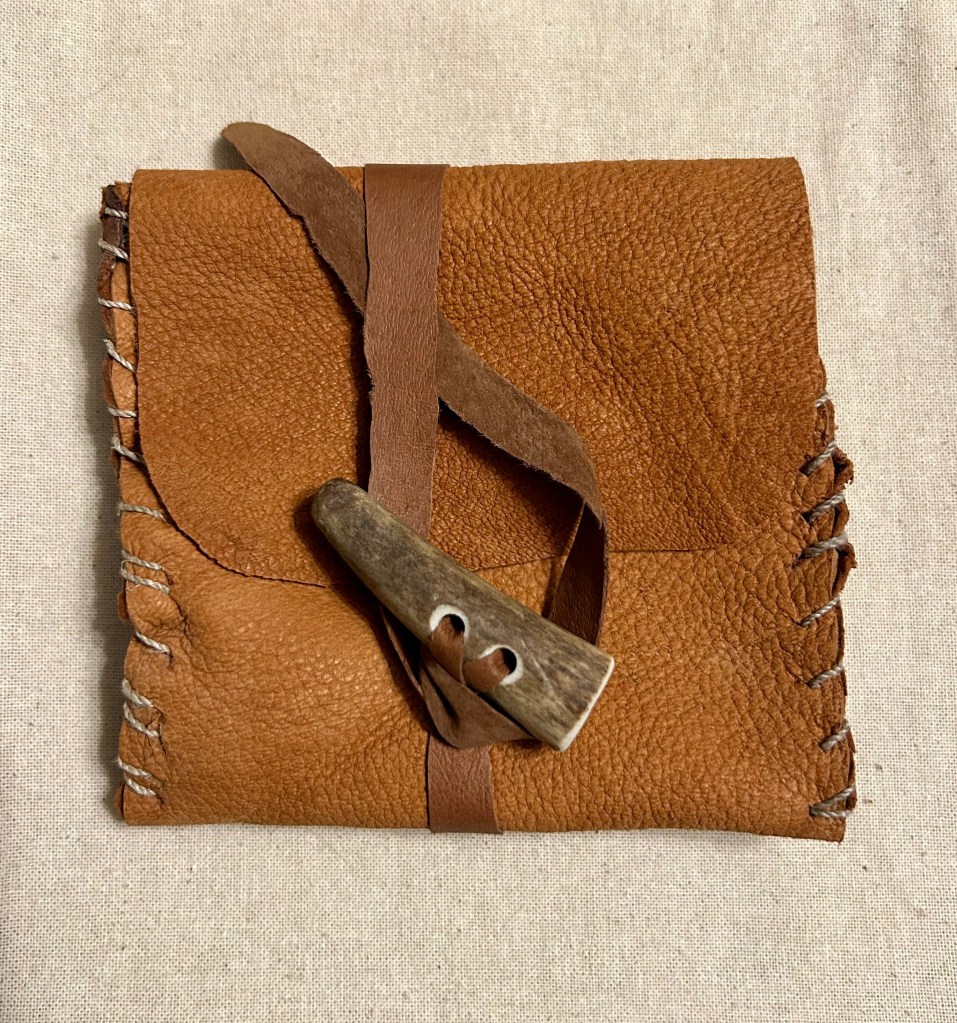
Our final project was to make a little leather bag to store our tools in. The fantastic part was that we could use the tools and techniques that we had already learned. Unfortunately, we didn’t have time to finish this project on the day, so I finished mine when I got home. I had to make a lot more cordage to sew the seams up. Also, my awl broke while I was making holes in the leather. I was sad at first but then I realised that this probably happened to people in the past as well and all I had to do was re-sharpen it. The bag itself isn’t perfect and it is a little wonky, but overall I’m happy with how it turned out. I ordered some antler tine toggles for the closure and bought some pig skin leather for a strap. I love how everything fits neatly inside.
Inspired by what I had learned at the workshop, I also bought myself some deer sinew to make more cordage with, as in the workshop, each of us only did a little bit of bashing on the sinew and my turn was at the beginning of the process, so I didn’t get to see how it progressed. To turn sinew into cordage you want to start with some dried deer tendons and you might think that this would be difficult to source but in the UK it seems that deer products are quite plentiful. Many deer products are marketed as ‘dog chews’, including, as it turns out, already dried out tendons! I was actually quite thankful about this, as I didn’t want to have to buy a food dehydrator for this part of the process. So, I did do quite a bit of bashing on one of the tendons. I probably did it for longer than was necessary because I wasn’t sure just how much it was going to fall apart. It turns out that I had to do a lot of manual work to tear the sections apart. In the end I managed to get a lot of fibre off of one tendon. I’m looking forward to working this up into some cordage so that I have a sample of it for teaching.
Sally has tutorials on YouTube for several of the items that we made:
Needle case
Cordage
Needle (although we didn’t make ours from scratch in the workshop)
Deer sinew
Saturday Evening
I couldn’t believe how quickly the day flew by and I was completely exhausted by the evening. But before we could eat, we listed to a talk given by Nicole DeRushie, who recently published her book Bog Fashion. Her talk was on the research she did on Damendorf Girl, a bog body discovered in Germany in the 1930s. The talk was fascinating and Nicole gave insight into how the clothing was interpreted at the time and how she approached her reconstruction. I was also very thankful that she brought a few copies of her book and I was finally able to get one!
I opted to stay overnight at the Ancient Technology Centre. We slept in the Viking Longhouse. I was a little nervous about this but I figured it would be an experience…and it was! I think I had one of the worst nights of sleep of my life. This had nothing to do with the Ancient Technology Centre at all, or the other people that also stayed overnight (who were all lovely!). It was probably just my own nerves and I had forgotten that I never slept well in communal situations and this was no different.
Despite the lack of sleep, Sunday was a new day and the sun graced us with its presence.
Sunday Morning: Weaving
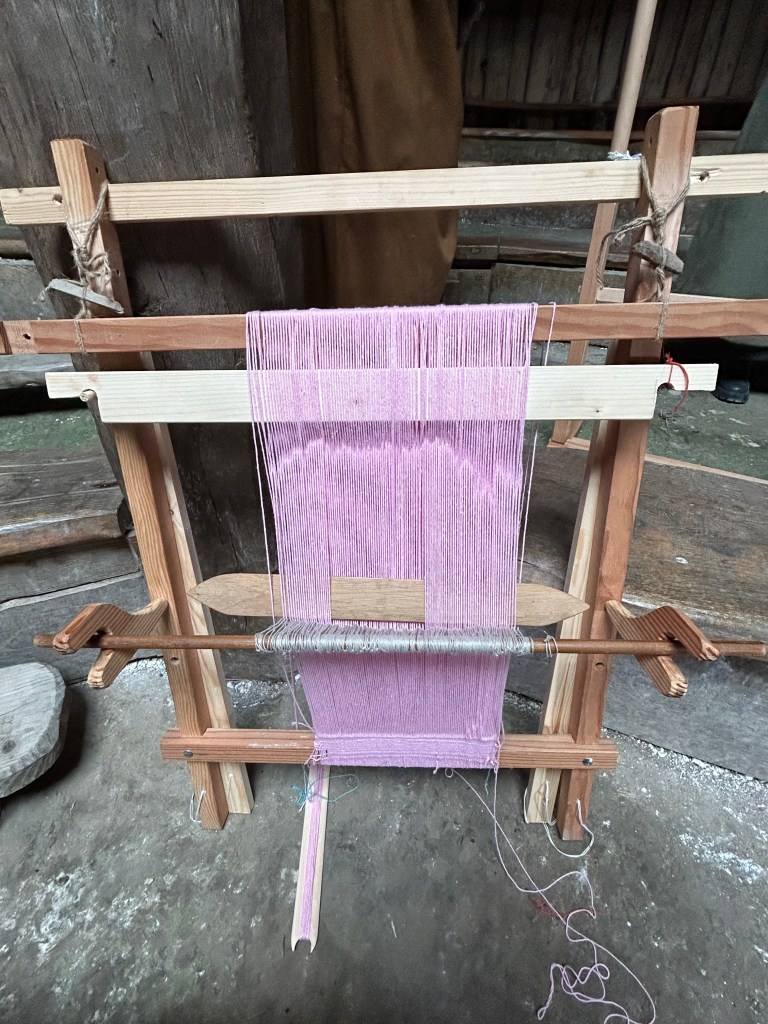
My group spent the morning with Jalea Ward from Slightly Warped Looms. This session was a little bit different from the others. Jalea brought several different types of looms and after explaining how each of them functioned and a bit about their history, we worked in pairs and tried out each loom.
I first tried out the Egyptian style horizontal ground loom. This was really intersting because, like the name suggests, it is on the floor, so the posture is completely different to what I’m used to. Functionally, it wasn’t much different to working with my warp-weighted loom. My partner for the session and I then tried out the small two-beam vertical loom and then the medieval style treadle loom. The two-beam loom is something that has intrigued me for a while now and I very much want to build one for myself and try weaving with it. I also really enjoyed weaving on the treadle loom. After learning to weave on the warp-weighted loom, I can see why these looms quickly became popular in medieval Britain. It just seems like it’s easier to weave faster and with more consistency.
Sunday Afternoon: Twining
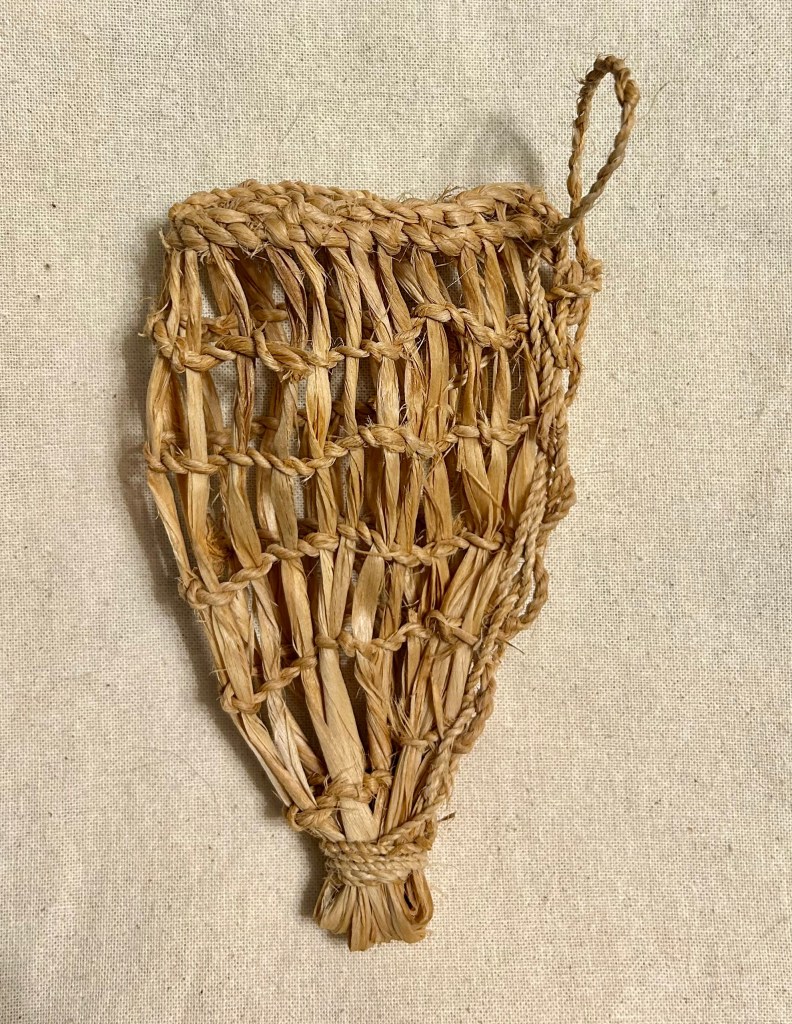
The very last workshop was with Vanessa Bunton from Puku B Historic Experiences. We had the option to do either twining or coil basketry. I really wanted to do both but I opted for the twining project. Twining is interesting and once you know how it works, you can see how this might have led on to weaving. It is essentially making cordage but by adding in perpendicular passive elements, it’s possible to create a web. Our project was to make a replica of Ötzi the Ice Man’s dagger sheath. As an archaeologist, I find Ötzi and his story to be absolutely fascinating. I remember hearing about his discovery when I was in school (I feel like it was probably in an edition of Weekly Reader?) but I’ll be honest, I hadn’t really followed up on any of the research until earlier this year. He lived sometime between 3350 and 3105 cal BCE and continues to tell us quite a lot about life in the Chalcolithic (Copper Age).
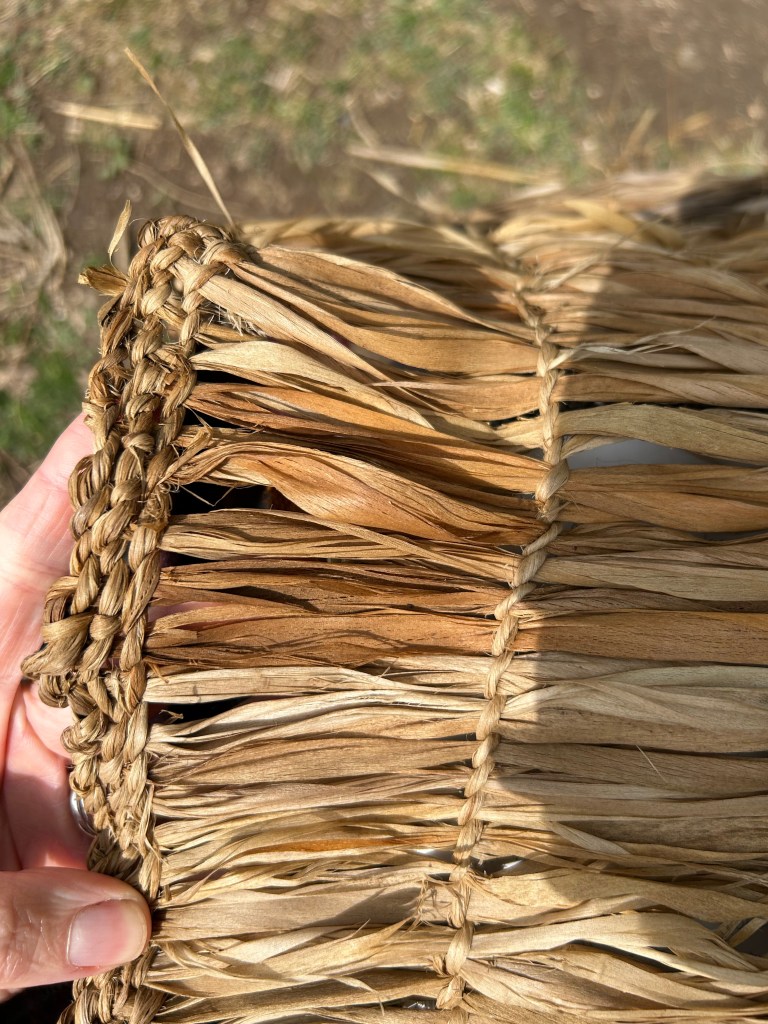
Apparently, it is not clear where the knife sheath was found in relation to Ötzi’s body but it contained a dagger made from a hafted chert knife blade (Weierer et al 2018). The knife sheath itself measured about 12cm in length and was made from the bast fibres of the lime tree (Tilia cordata). I hadn’t worked with lime tree bast until I bought some earlier this year because I wanted to see what it was like…and it has quickly become one my favourite fibres to work with!
It is essentially the inner bark fibres from the tree that have been allowed to ‘ret’, which essentially means it is left to rot (usually in water), which lets the fibres break down a bit. The result is material that splits into thin sheets that can be torn into strips. It is high flexible and very strong. There’s a range of different textures, some has more of a paper feel, while other sections are stiffer and have a more open network of fibres. These differences come from the natural variability found through the thickness of the bast fibres and whether they’re more towards the interior of the tree trunk, or more towards the bark side.

When working with lime bast, besides the texture of the fibres, there’s two other characteristics that I’ve noticed. The first is the ‘aroma’, which very noticeable! I kind of like it. It doesn’t smell like rotting vegetation and I don’t think it’s a bad smell at all (Linda Hurcombe even described it as ‘pleasant’). But it does stand out and I can pretty much recognise it anywhere now. This summer I walked into one of the reconstructed houses at Stonehenge and I immediately smelled the hanging bunch of lime bast fibres! Anyways, the other characteristic I’ve noticed is that sometimes is has a bit of a ‘waxy’ sort of feel to it.
My attempt at Ötzi’s knife sheath isn’t too bad. I had to start it over a couple of time. I found the first few rows difficult because I got my passive strands mixed up and kept trying to incorporate them into the cordage. I think I could have use thicker bundles for the passive strands and twisted them a bit more than I did but I’m happy with it as a first attempt.

Final thoughts
Overall, I had a fantastic time at the Heritage Textile Weekend. I was completely exhausted by the end and I was certainly glad to be back in my own bed for a good night’s sleep afterwards. I would love to go back next year, if I’m able to. I felt like I learned a lot and it was really lovely meeting so many other people with interests similar to my own. If I go back, I’ll be sure to take more photos!
I’m also planning to write a blog post on the Iron Age inspired clothing that I wore for the weekend, so keep an eye out for that one!
References
Leoni Sherwood, N. and Forssman, T., 2024. Identifying use-wear distributions on sewing needles: Possible Later Stone Age sewing needle made from a tooth root at Little Muck Shelter, South Africa. Journal of Archaeological Science: Reports, 53, 104347. https://doi.org/10.1016/j.jasrep.2023.104347
Hardy, B. L., Moncel, M.-H., Kerfant, C., Lebon, M., Bellot-Gurlet, L. and Mélard, N., 2020. Direct evidence of Neanderthal fibre technology and its cognitive and behavioral implications. Scientific Reports, 10 (1), 4889. https://doi.org/10.1038/s41598-020-61839-w
Hurcombe, L.M. 2014. Perishable material culture in prehistory, investigating the missing majority. London: Routledge.
Wierer, U., Arrighi, S., Bertola, S., Kaufmann, G., Baumgarten, B., Pedrotti, A., Pernter, P. and Pelegrin, J., 2018. The Iceman’s lithic toolkit: Raw material, technology, typology and use. PLOS ONE, 13 (6), e0198292. https://doi.org/10.1371/journal.pone.0198292

Leave a comment