After making a tea towel as my first actual completed project on the warp-weighted loom, I was keen to continue to explore weaving. I was feeling confident enough to buy some wool yarn to try out. I did A LOT of research trying to find a commercially prepared yarn that is similar to the wool yarns used in Iron Age northern Europe. Ideally, what I wanted was a worsted-spun single yarn that will let me weave something with a sett of about 8–10 ends/cm.
In the end I bought some yarn from Laura’s Loom. I really like the ethos of this company. She sources wool from local farmers and commissions mills to do the scouring and spinning. The yarn I bought isn’t specifically worsted spun but it did work well. I used her Hebridean single (a mix of Hebridean, Black Welsh mountain, and Shetland) in the colour ‘Tarbet’.
I wanted to plan on weaving a sample because I was expecting working with wool to be different than with cotton and I didn’t want to commit to anything too big or complicated. So, my goal was to weave in tabby and make my sample about 12 inches (30cm) wide.
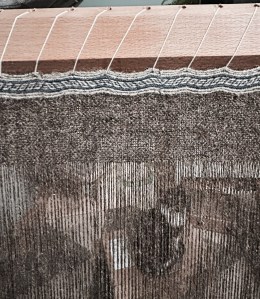
Tablet woven border
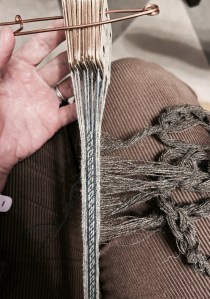
I started by making a tablet woven band. This time I used a pattern based on one of the bands from the Oseberg ship burial. This is a very simple pattern and was easy to follow. However, I completely underestimated the amount of take-up with tablet weaving! I wanted my band to be a little longer than 30cm, so I figured that if I made the warp threads the width of my loom warp-beam, it would be fine. This was not the case! I tried to fix the problem by replacing each of the warp threads but I was running out of yarn too quickly….so I ended up abandoning this attempt and just starting completely over. I really did NOT want to do this but in the end, it was the best option.
Wool is QUITE different to weave with compared with the cotton yarn I was using previously. I had problems with sticky fibres that caused problems with the shed opening. This problem got worse because I didn’t want to reverse the pattern, which meant that I was spending a lot of time untwisting groups of yarn, which then caused fibres to loosen and the yarn became even stickier! In the end I decided the reverse the pattern to avoid this problem. I also sprayed my warp with hairspray to try and make the yarn less sticky, which I think helped a bit. I got there in the end!
Weaving the fabric
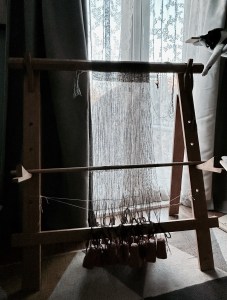
The weft on my tablet woven band becomes the warp on my warp-weighted loom. I had about 7.2 warp threads/cm, which I was okay with. I changed my weights for this project, as I made some small pyramidal shaped ceramic weights. I had about 14 threads per loomweight, which meant that each warp thread had about 27–28g/thread.
Weaving went really well and was very different from weaving with cotton. I thought it was going to take forever because the yarn is so much thinner but it actually wasn’t too slow. Once I got going, I could weave several centimetres in an evening. I started by making bubbles like I did with the cotton, but this actually caused my woven fabric to expand OUTWARDS because there was too much weft. Then I tried no bubble, but the fabric started to pull in too much. In the end, the answer was 3-4 small shallow bubbles and there wasn’t too much pulling in. I had to occasionally massage the selvedges, or use a needle, to even out the warp thread spacing.
Finishing the weave
I wove until I couldn’t weave much more and used a hem stitch on the bottom before taking it off the loom. This was fun to learn and makes a nice finish. I decided to cut the sample into three pieces because I wanted to see how the fabric was going to change when washed but I also wanted to compare hand washing and machine washing (each sample was washed twice following the manufacturer’s instructions).
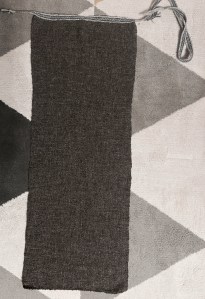
Sample 1: hand-washed in the sink, excess water squeezed out, dried.
- Warp: 8.4 threads/cm
- Weft: 8.2 threads/cm
- hand-washed in the sink, excess water squeezed out.
- Air dried.
Sample 2:
- Warp: 7.9 threads/cm
- Weft: 7.9 threads/cm
- washed in washing machine on the silk cycle at 30 degrees C, spin cycle on 600 revolutions/second.
- Air dried.
Sample 3:
- Warp: 9 threads/cm
- Weft: 8 threads/cm
- Not washed.
Final thoughts
Despite the problems I had with the tablet woven border, I actually really liked weaving with wool. It is a lot easier than the cotton yarn I was using previously. It just felt more forgiving if that makes sense? I don’t think cotton is very good for beginner weavers, especially not on the warp-weighted loom, which has its own challenges! I chose the cotton to learn the process of setting up the loom and it was cheap enough that I wouldn’t be as worried about making mistakes. For any others new to weaving, don’t give up if you try weaving with cotton on the warp-weighted loom! It gets better when you weave with wool!!!

Leave a comment